Wednesday, March 7, 2018

HP ENVY 6200, 7100, 7800 Printers - 'Carriage Jam' Error

Make sure the carriage can move freely
Make sure the carriage moves freely across the width of the printer.
  1. Turn on the printer, if it is not already on.
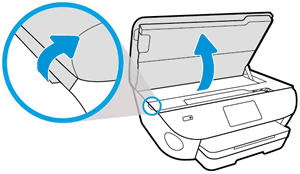
  2. Open the ink cartridge access door.
    Figure : Opening the ink cartridge access door
    Opening the ink cartridge access door
  3. Wait until the carriage is idle and silent before you continue.
  4. With the printer turned on, disconnect the power cord from the rear of the printer.
  5. Unplug the power cord from the power source or electrical outlet.
       WARNING:
    You must unplug the power cord to move the carriage by hand and reset the paper feed mechanism without the risk of electrical shock.
  6. Use a flashlight to check for any paper or objects that might be restricting the carriage, and then remove any paper or objects that you find.
       CAUTION:
    If the paper tears when you remove it from the rollers, check the rollers and wheels for torn pieces of paper that might remain inside the printer. If pieces of paper remain in the printer, more paper jams can occur.
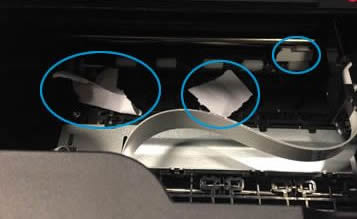
  7. Reach inside the printer through the ink cartridge access door, and then manually move the carriage.
    • If the carriage is stuck on the right side of the printer, move the carriage to the left side of the printer.
    • If the carriage is stuck on the left side of the printer, move the carriage to the right side of the printer.
    • If the carriage is stuck in the middle of the printer, move the carriage to the right side of the printer.
  8. Remove any loose paper or obstructions found.
  9. Make sure the carriage can move freely across the width of the printer. Firmly push the carriage to the left side of the printer, and then push it to the right side.
  10. Close the ink cartridge access door.
  11. Reconnect the power cord to the rear of the printer.
  12. Plug the power cord back into the power source or electrical outlet.
  13. Turn on the printer.

Friday, December 11, 2015

HP Officejet Pro 8610/8620/8630 e-All-in-One Printer Firmware Update


Released: 2015-03-17
File name: OJP8610_R1502A.zip [1/1, 23.02M]
Version FDP1CN1502AR
Released: 2015-03-17
File name: OJP8620_R1502A.zip[1/1, 23.18M]
Version FDP1CN1502AR
Released: 2015-03-17
File name: OJP8630_R1502A.zip[1/1, 23.18M]
Version FDP1CN1502AR
Improvement to connectivity robustness

Improvement to paper-path reliability

HP LaserJet Pro 200 color MFP M276nw and M251 Series

HP LaserJet Pro 200 color MFP M276nw and M251 Series
1.
Released: 2015-02-24
File name: M276_colorMFP_Series_FW_Update-20150212.exe[1/1, 14.33M]
Version : 20150212
Fix/Enhancement
Contains all previous fixes and enhancements.

Fixes a potential vulnerability issue (CVE-2014-3566) also known as the POODLE SSL v3.0 vulnerability.

This release addresses multiple issues which may cause the device to not wake from sleep mode.

Addresses an issue where the device may not wake up from sleep mode when receiving a fax if it is connected to an improperly grounded 220v power source.

Fixes an issue that may cause the device to fail to wake from sleep mode when receiving a print job over the network.

Fixes an issue where the printer may fail to wake from sleep mode when connected to an 802.1x wireless network.

Fixes an issue where the printer may stop responding to incoming network traffic for up to 10 seconds while coming out of sleep mode.

Fixes an issue where the printer might display a Scanner Error 17 or hang on the "Initializing…" screen when waking from sleep mode.

Addresses an issue where the outer buttons (home, back and the left and right arrows) on the touch screen control panel may become unresponsive when the product comes out of sleep mode.

Corrects an issue where 72 point size fonts or greater may not print.

Fixes an issue that might cause a 49 or 79 error when printing certain documents.

Fixes an issue that might cause a 49 error when scanning or copying a

Thursday, December 10, 2015

Photosmart : Click a photo and Print the same way .... :) but Paper Matters a LOT

                        Recommended papers for photo printing


If you want the best print quality, HP recommends using HP papers that are specifically designed for the type of
project you are printing. Depending on your country/region, some of these papers might not be available.
Paper Description
HP Premium Plus Photo Paper HP’s best photo paper is heavyweight for producing
professional-quality photos. Features an instant-dry finish for
easy handling without smudging. It resists water, smears,
fingerprints, and humidity. It is available in several sizes,
including A4, 8.5 x 11 inch, 10 x 15 cm (4 x 6 inch), 13 x 18
cm (5 x 7 inch) and two finishes – high gloss or soft gloss
(satin matte). It is acid-free for longer lasting documents.
HP Advanced Photo Paper This thick photo paper features an instant-dry finish for easy
handling without smudging. It resists water, smears,
fingerprints, and humidity. Your prints have a look and feel
comparable to a store processed photo. It is available in
several sizes, including A4, 8.5 x 11 inch, 10 x 15 cm (4 x 6
inch), 13 x 18 cm (5 x 7 inch) and two finishes – glossy or
soft gloss (satin matte). It is acid-free for longer lasting
documents.

HP Everyday Photo Paper Print colorful, everyday snapshots at a low cost, using paper
designed for casual photo printing. This affordable, photo
paper dries quickly for easy handling. Get sharp, crisp
images when you use this paper with any inkjet printer.

Available in glossy finish in 8.5 x 11 inch, A4, 4 x 6 inch and
10 x 15 cm. It is acid-free for longer lasting documents.

HP Photo Value Packs HP Photo Value Packs conveniently package Original HP ink
cartridges and HP Advanced Photo Paper to save you time
and take the guesswork out of printing affordable Lab-quality
photos with your HP printer. Original HP inks and HP
Advanced Photo Paper have been designed to work together
so your photos are long lasting and vivid, print after print.
Great for printing out an entire vacation’s worth of photos or
multiple prints to share.

HP Deskjet, Officejet, Photosmart, and PSC All-in-One Printers - 'Door Open' Error Message Displays on the Control Panel

Issue
The 'Door Open' error message displays on the control panel of the product.
Solution
Follow these steps to resolve the issue.
Step one: Close the cartridge door completely
If the cartridge door is not completely closed, the error message displays.
  1. Open, and then close the cartridge door of the product. Make sure that the door rests securely against the body of the product.
    Figure : Examples of closing the cartridge door (your product might vary)
    Illustration of different ways cartridge doors close.
     NOTE:
    To see how to close the cartridge door of your specific model, see the cartridge section of your product's User Guide.
  2. Check the product control panel to see if the error message still displays.
  • If these steps resolved the issue, there is no need to continue troubleshooting.
  • If the issue persists, see the next step.
Step two: Check the cartridge door for obstructions
  1. Inspect the door and the area around it to make sure that no obstructions prevent the door from closing completely.
     NOTE:
    Bits of paper, packing materials, and tape might prevent the door from closing completely.
  2. Remove any obstructions.
  3. Check the product control panel to see if the error message still displays.
  • If these steps resolved the issue, there is no need to continue troubleshooting.
  • If the issue persists, see the next step.
Step three: Reset the product
  1. Press the Power button () to turn on the product.
  2. Disconnect the USB cable from the back of the product.
  3. Disconnect the power cord from the electrical outlet.
  4. Disconnect the power cord from the product.
  5. Wait 30 seconds.
  6. Reconnect the power cord to the electrical outlet.
  7. Reconnect the power cord to the product.
  8. Press the Power button () to turn on the product.
  9. Reconnect the USB cable to the product.
  10. Check the product control panel to see if the error message still displays.
  • If these steps resolved the issue, there is no need to continue troubleshooting.
  • If the issue persists, see the next step.

Thursday, January 8, 2015

Vertical Bands, Lines, or Streaks in Copies, Faxes, or Scans

When you copy, fax, or scan an original, the resulting output contains vertical bands, lines, or streaks in one or more colors.
When you print the original, the output is normal.
Figure 1: Sample output with vertical white or black lines
Photos with vertical white lines, black lines
Figure 2: Sample output with vertical colored bands or lines
Pages with vertical colored lines, bands
Try the following solutions in the order presented to resolve the issue. When one of the solutions resolves the issue, there is no need to continue troubleshooting.

Solution one: Make sure that the scanner lid is closed before turning on the printer

Turning on the printer when the scanner lid is open might cause poor scan quality, like vertical streaks and lines. Before turning on the printer, remove paper and other items from the scanner glass, and then close the scanner lid. This allows the scanner to properly start and calibrate.
  • If these steps resolved the issue, you do not need to continue troubleshooting.
  • If the issue persists, continue to the next solution.

Solution two: Reset the printer

Static interference or loose power connections can result in bands or lines in the copy, fax, or scan output. To resolve this issue, check the printer connections and then reset the printer.
 Important: When you perform this step, close the scanner lid for a proper scan calibration.
  1. Lift the scanner lid, and then remove any paper from the scanner glass.
    Figure 3: Lift the scanner lid
    Image: Lift the scanner lid.
  2. Close the scanner lid.
  3. Remove any paper from the automatic document feeder (ADF) tray.
    Figure 4: The automatic document feeder (ADF)
    Image: The automatic document feeder (ADF).
  4. Press the Power button to turn on the printer.
    NOTE:The printer might go through a warm-up period. The printer lights might flash, and the carriage might move. Wait until the warm-up sequence finishes and your printer is quiet before you proceed.
  5. With the printer turned on and the home screen displayed on the printer control panel, disconnect the power cord from the rear of the printer.
  6. Unplug the power cord from the wall outlet.
  7. Wait at least 15 seconds.
  8. Plug the power cord back into the wall outlet.
    NOTE:HP recommends that you connect the printer power cord directly to the wall outlet.
  9. Reconnect the power cord to the rear of the printer.
  10. If the printer does not automatically turn on, press the Power button to turn it on.
    NOTE:The printer might go through a warm-up period. The printer lights might flash, and the carriage might move. Wait until the warm-up sequence finishes and your printer is quiet before you proceed.
  11. Try to copy, fax, or scan again.
  • If these steps resolved the issue, you do not need to continue troubleshooting.
  • If the issue persists, continue to the next solution.

Solution three: Clean the ADF scanner glass strip, the white ADF plastic strip, the scanner lid, and the scanner glass

If any part of the scanner glass or scanner lid has fingerprints, smudges, lint, dust, or other debris, this can slow performance and affect copy and scan quality. To resolve this issue, clean the ADF scanner glass strip, the white plastic ADF strip on the underside of the scanner lid, the underside of the scanner lid, and the scanner glass.

Step one: Gather the following materials

Gather the following materials to clean the scanner.
  • Several clean, soft, lint-free cloths
  • Mild glass cleaner
  • Flashlight
CAUTION:Use only glass cleaner to clean the scanner glass. Do not use cleaners that contain abrasives, acetone, benzene, or carbon tetrachloride. These substances can damage the printer. Avoid isopropyl alcohol (rubbing alcohol) because it can leave streaks on the glass.

Step two: Clean the ADF scanner glass strip and the white plastic ADF strip on the underside of the scanner lid

  1. Press the Power button to turn off the printer.
  2. Disconnect the power cord from the rear of the printer.
  3. Lift the scanner lid.
    Figure 5: Lift the scanner lid
    Image: Lift the scanner lid.
  4. Place the printed page with streaks or lines next to the ADF scanner glass strip to help identify the area or areas on the glass that created the streaks or lines.
    NOTE:If needed, use a flashlight to see any debris on the ADF scanner glass strip that created the streaks or lines.
    Figure 6: Locate debris on the ADF scanner glass strip
    Image: Locate debris on  the ADF scanner glass strip.
  5. Spray a clean, soft, lint-free cloth with mild glass cleaner.
    CAUTION:To protect the scanner, do not spray the glass cleaner directly on the glass.
  6. Use the lint-free cloth to clean the area of the ADF scanner glass strip that caused the streaks or lines.
    Figure 7: Clean the ADF scanner glass strip
    Image: Clean the ADF scanner glass strip.
  7. Use the lint-free cloth to clean the white plastic ADF strip on the underside of the scanner lid.
    Figure 8: Clean the ADF strip on the underside of the scanner lid
    Image: Clean the ADF strip on the underside of the scanner lid.
  8. Dry the ADF scanner glass strip and the underside of the scanner lid thoroughly with a clean, dry cloth or chamois to prevent spotting.
    NOTE:Do not use paper-based wipes or tissues that can leave fiber residue.
  9. Close the scanner lid.
  10. Reconnect the power cord to the rear of the printer.
  11. If the printer does not automatically turn on, press the Power button to turn it on.
    NOTE:The printer might go through a warm-up period. The printer lights might flash, and the carriage might move. Wait until the warm-up sequence finishes and your printer is quiet before you proceed.
  12. Try to copy, fax, or scan again.
  • If these steps resolved the issue, there is no need to continue troubleshooting.
  • If the issue persists, see the next step.

Step three: Clean the underside of the scanner lid and the scanner glass

  1. Press the Power button to turn off the printer.
  2. Disconnect the power cord from the rear of the printer.
  3. Lift the scanner lid.
    Figure 9: Lift the scanner lid
    Image: Lift the scanner lid.
  4. Place the printed page with streaks or lines next to the scanner glass to help identify the area or areas on the glass that created the streaks or lines.
    NOTE:If needed, use a flashlight to see any debris on the scanner glass that created the streaks or lines.
    Figure 10: Locate debris on the scanner glass
    Image: Locate debris on the scanner glass.
  5. Spray a clean, soft, lint-free cloth with mild glass cleaner.
    CAUTION:To protect the scanner, do not spray the glass cleaner directly on the glass.
  6. Use the lint-free cloth to clean the area of the scanner glass that caused the streaks or lines.
    Figure 11: Clean the scanner glass
    Image: Clean the scanner glass.
  7. Use the lint-free cloth to clean the underside of the scanner lid.
    Figure 12: Clean the underside of the scanner lid
    Image: Clean the underside of the scanner lid.
  8. Dry the scanner glass and the underside of the scanner lid thoroughly with a clean, dry cloth or chamois to prevent spotting.
    NOTE:Do not use paper-based wipes or tissues that can leave fiber residue.
  9. Close the scanner lid.
  10. Reconnect the power cord to the rear of the printer.
  11. If the printer does not automatically turn on, press the Power button to turn it on.
    NOTE:The printer might go through a warm-up period. The printer lights might flash, and the carriage might move. Wait until the warm-up sequence finishes and your printer is quiet before you proceed.
  12. Try to copy, fax, or scan again.
  • If these steps resolved the issue, you do not need to continue troubleshooting.
  • If the issue persists, continue to the next solution.

Solution four: Clean the automatic document feeder (ADF)

Follow these steps to clean the various parts of the ADF, and then make blank copies to check if the issue is resolved.

Step one: Gather the following materials

Gather the following materials to clean the various parts of the ADF.
  • Several clean, lint-free cloths, or any cloth that does not come apart or leave fibers
  • Distilled, filtered, or bottled water (tap water might damage the printer)

Step two: Clean the pick rollers and the separator pad

Follow these steps to clean the ADF pick rollers and the separator pad.
  1. Remove any documents from the ADF tray.
  2. Press the Power button to turn off the printer.
  3. Disconnect the power cord from the rear of the printer.
  4. Lift the cover of the ADF until it stops.
    Figure 13: Lift the ADF cover
    Image: Lift the ADF cover.
  5. Locate the pick rollers and the separator pad.
    Figure 14: Locations of the pick rollers and the separator pad
    Image: Locations of the pick rollers and separator pad.
    1 - The ADF cover
    2 - The pick rollers
    3 - The separator pad
  6. Lightly dampen a clean lint-free cloth with distilled or bottled water, and then squeeze any excess liquid from the cloth.
  7. Use the damp cloth to remove residue from the separator pad. The separator pad on your printer might look like one in the following images.
    Figure 15: The separator pad
    Image: Photograph of the separator pad.
    Figure 16: The separator pad
    Image: Photograph of the separator pad.
  8. Use the damp cloth to remove residue from the pick rollers. The pick rollers on your printer might look like those in one of the following images.
    Figure 17: The pick rollers
    Image: Photograph of the pick rollers.
    Figure 18: The pick rollers
    Image: Photograph of the pick rollers.
  9. Depending on your printer model, locate the white roller and the gray rubber pad.
    Figure 19: The white roller and gray rubber pad
    Image: Photogragh of the white roller and gray rubber pad.
  10. Use the damp cloth to remove any residue from the white roller and the gray rubber pad.
  11. Dry the pick rollers, the separator pad, the white roller, and the gray rubber pad with a clean, dry, lint-free cloth.
  12. Close the ADF cover.

Step three: Make a blank copy using the ADF

Follow these steps to make a blank copy using the ADF.
  1. Reconnect the power cord to the rear of the printer.
  2. If the printer does not automatically turn on, press the Power button to turn it on.
    NOTE:The printer might go through a warm-up period. The printer lights might flash, and the carriage might move. Wait until the warm-up sequence finishes and your printer is quiet before you proceed.
  3. Lift the scanner lid, and then remove any originals from the scanner glass.
    Figure 20: Lift the scanner lid
    Image: Lift the scanner lid.
  4. Close the scanner lid.
  5. Load unused, plain white paper into the input tray.
  6. Load a blank, white sheet of paper into the ADF tray.
  7. Slide in the paper width guides on the ADF tray until they rest against the edges of the paper.
  8. From the home screen on the printer control panel, touch Copy.
  9. Touch Black or Start Black to start the copy.
    • If the copy is clean, you can stop troubleshooting.
    • If the copy has vertical bands, lines, or streaks, there might be dust inside the printer, poor internal connections, or the printer might be damaged. Continue to the next solution.

Monday, January 5, 2015

your printer sleeps .. hey wake up doesn't work!!!

                                                               HERE IS THE TIP


1.As per Energy Star norms, all electronic products should go into sleep mode when idle for specified period to save power.

2.We usually observe that printer does not wake up after entering into sleep mode specially when connected over network due to the fact that it is not able to communicate with the router or PC. Make sure you check and update the printer with latest firmware and perform hard reset.

3.Do not get confused between Sleep mode and Auto Power OFF features. Auto Power OFF > Printer turns OFF completely after the specified period and customer has to use the power button to turn the printer back ON, unlike Sleep mode where the printer wakes up when print job.

4.Auto Power OFF can be set to Never (Disabled) but we cannot disable Sleep mode (max setting is 15 mins).

5.Certain features (Scanning, Faxing and Front Panel controls and Wireless features) of the printer can be disabled, if these options are disabled via EWS; printer will not wake up from sleep more or respond to the specific job related to the disabled features.

6.Set the manual IP on the printer to stop printer from continuous ping when it goes in sleep mode.